Connect
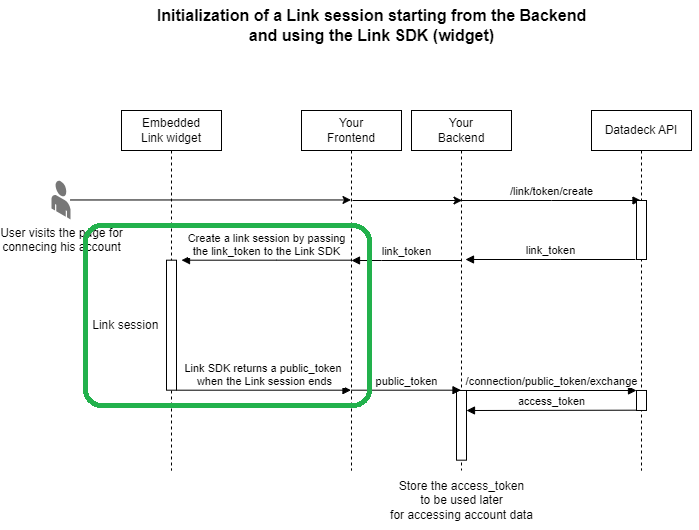
With a valid Link token, you can proceed to the next step which is making the connection. For this, you pass the Link token obtained to the Link widget, allowing the end-user to go through a Link session for securely entering his credentials.

Using Link, the user will be able to search for and find the desired Data Source. On subsequent screens they will be able to submit their Username and Password securely. Each Data Source is associated with Source_id. When the user selects the desired Data Source and then inputs their Login Information, Link will capture all this information and call the /link/connect endpoint for you, along with the Link_token.
In response to this request, a Public_token will be received. You need to watch out for this Public_token as it is essential to continue in the journey.
Learn how to integrate the Link widget into your website and how to use the Link token by studying the Quickstart code sample or by reading more about the Link SDK.
Creating a new connection
This is the type of request that is done by Link to the Deck API in order to make a connection request and obtain a Public_token:
Request
curl -X POST "https://sandbox.deck.co/api/v1/link/connect" \
 -H "accept: application/json"\
 -H "content-type: application/json" \
 -d '{ "link_token" : "link-sandbox-17d2f9a7-af3d-4ee4-abf4-08dc0b1ba585" , "source_id" : "029c1f37-0ef0-5b06-8c9b-655fb4a83315" , "fields": [ { "field_name": "username", "field_value": "my-username" }, { "field_name": "password", "field_value": "my-password" } ]}'
Response
{
  "public_token": "public-sandbox-2cb297b7-b110-4000-8c36-4aae9fbbb401"
}When using a link token that was created in update mode, the /connect endpoint will not return a public token.
The Link widget is responsible for making that call, you don't need to implement it yourself when the Link widget is integrated onto your website.
Updated 2 days ago
